Vrchat How to Upload a Custom Image Background
Unlimited environments and characters look in VRChat, where yous can even create your ain custom, 3D avatars to greet the earth on your own terms!
Adding a virtual reality component to the 3D Second Life chat room mode, VRChatis substantially dozens of games rolled into 1. Desire to build a treehouse with your friends? Cool, no problem. Prefer to serve drinks at a digital lounge while someone blasts music through their mic? Totally doable.
But to do all of that, you're going to need a confront. And a torso. And that comes in the form of an avatar. While in that location are some basic starting avatars to pick to stand for yourself -- ranging from chibi anime girls to skeleton warriors to hulking robots -- the real draw to VRChat is the ability to create your own custom avatar.
Although the procedure is complex and requires a little 3D modeling skill, only about anyone can become their own custom avatars congenital and uploaded to the game in an afternoon following the guide beneath.
Getting Started Creating Custom VRChat Avatars
We're about to go through a crash course in model creation, and before you can go started building your virtual self, you demand todownload Unity (yep, that big game development tool everybody uses). Only choose the download banana link at the peak of the list for your specific OS, as that will guide you through downloading the right files you need for Unity.
Besides Unity, you also have todownload the SDK from the VRChat website. Note that this requires creating a new VRChat account (instead of using your linked Steam account) if you lot've been logging into the game through Steam.
Don't do anything with the SDK file even so. Instead, open up Unity and start a new project. Choose 3D from the radio buttons, proper name the projection whatever you desire (probably something like "VRChat custom avatar" ...), and then click Create Projection.
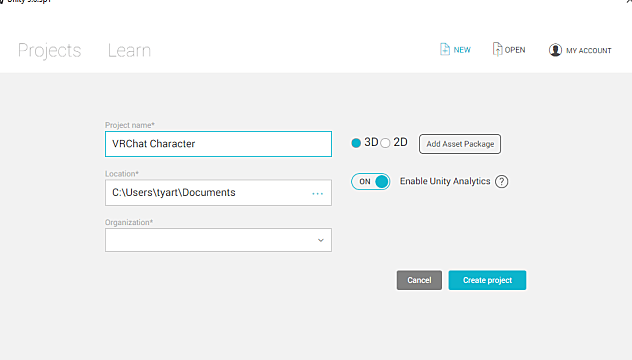 Starting a new Unity projection
Immediately close the projection after creating it, and then head to the location where you lot downloaded the SDK file and double-click it (after installing Unity, the SDK should now testify a Unity icon).
At present click the name of your project in the menu. In the popular-up window that appears, click Import. All the SDK data will be imported to your bare, custom avatar project automatically. Unless you lot have a spectacularly beefy computer, look this process to take several minutes.
Now you take to log into the SDK with your VRChat business relationship info (non your Unity account). Open up the VRChat SDK drop-down menu at the top of the screen and choose Settings, then enter your business relationship proper name and password for VRChat.
 Signing into VRChat through Unity
Begin Edifice A Custom Avatar With A Character Model
Beginners will want to beginning with a specific grapheme model that's already been created rather than building their own -- and there are plenty of model resources beyond the web you can import to get started on your VRChat model. Here are a few places to go started:
- Deviantart 3D Character Models
- Models-Resource.com
- Sketchfab
The Unity Asset Store might be your best bet to get started, as the models there are pre-rigged, meaning they will be the format you lot demand to utilize correct off the bat and you don't need to do anything extra to go their limbs moving properly. In that location are plenty of free models to browse through there besides, from armored knights to brave shirtless commandos (and yes, plenty of potential waifus).
If you are using the Asset Store, find a model you want and cull Download, and then clickOpen In Unity to automatically add it to your project. The aforementioned download screen on your browser will appear in the eye Game window in Unity. From at that place, click Download once more, then chooseImport in the popular-upwardly menu to put all the model's data in your project.
If you are using a model from some other source besides the Unity Store, instead open the Avails carte at the top and so choose Import New Asset. From in that location, select the location of the model data on your hard drive.
The proper name of the custom model will appear in the Assets window at the bottom of the screen next to the VRCSDK folder. Double-click the model folder, then double-click the Testscene push button that has the Unity icon to open up the model in a scene (if there's no Testscene push button, just select the proper noun of the model instead to pull it up).
Underneath the Testscene heading in the Bureaucracy window on the left side of the screen, click the name of your model. Next, on the far right side of the screen, switch from the Services tab to the Inspector tab.
A whole bunch of info will appear hither that won't brand sense at first, but don't worry, nosotros're non using about of that. Now click the Add Component button at the lesser of the options and type "VR" into the search box to bring upwardly a list of components. Click the check box labeled VRC_Avatar Descriptor, which gives you all the info you need to ensure the model fits VRChat's specifications.
![]() Adding the VRC_Avatar Descriptor component
Adding the VRC_Avatar Descriptor component
Make Certain Your Custom Avatar Works Before Publishing
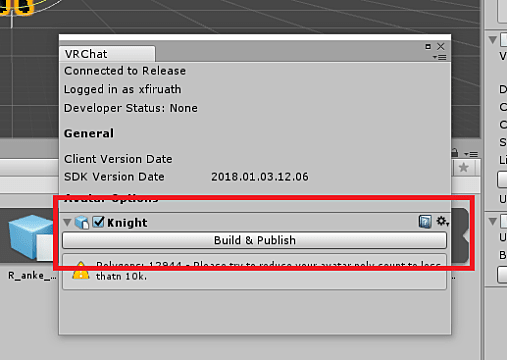
From here, you lot can technically publish your avatar to VRChatimmediately, but you volition probably need to make changes. Open the VRChatSDK drop-down carte du jour again and select Evidence Build Command Console to go some info to help guide your model. For instance, the yellow triangle prompts may tell you the model has too many polygons, or that the angles between sure bones aren't optimized for the VRChat experience.
This is where y'all can see a lot of unexpcted problems, and a full Unity modeling tutorial is simply beyond the scope of this commodity. For the most function, you lot can find the options easily for changes, but in some cases you may need to dive into Unity's documentation.
If your model is too large, for instance, head over to the Inspector tab again, and change the numbers in the Scale settings to modify the figure (such as putting 0.5 on the X or Y centrality to reduce the peak or girth of the model by half).
After making any necessary changes, click the Auto Detect push halfway down the Inspector tab to make sure everything is set up how VRChat needs information technology, then click Build & Publish in the Build Control Console window. Once more, this procedure is going to take a long time on lower-end machines.
Consummate and Upload Your Custom VRChat Avatar
Once the build process is done, the eye Game panel of Unity will bring up the New Avatar screen, where you lot can name your avatar, write a description, and mark whatsoever check boxes for tearing content.
Note that you accept to check a box indicating you own the rights to whatsoever graphic symbol you upload. While that won't exist a problem if yous are using the Unity store, licensing rights tin be an upshot if yous are downloading famous characters similar Sonic from another source. Evidently people are ignoring this rule, since you lot'll see tons of licensed characters in the game, merely be aware it may atomic number 82 to legal problems for VRChat in the future and a potential crackdown on what gets uploaded.
Click Upload to transport your snazzy new Avatar to the VRChat world! Now close Unity and open upVRChat. Log in with the aforementioned credentials you used to create the avatar, and it volition be ready and waiting to apply in the game!
 Using a custom 3D knight model from the Unity Store
Plain, 3D model cosmos is a complex process where you can striking plenty of snags, especially when trying to get a pre-made character to work with VRChat's specifications. For advanced techniques and a list of useful tertiary-party tools to make this process smoother, check out the VRChat Wikia hither.
Let us know when you manage to get your custom VRChat avatar built and uploaded so nosotros can check it out in the game!
If you're looking for more content on this game, make sure to cheque out our other VRChat guides! Hither are a few to go you lot started:
- How to Prepare VRChat's Space Loading Loop
- VRChat Beginner's Guide
- Can I Play VRChat Without a Headset?
Published May. 1st 2021
robinsonbhars1951.blogspot.com
Source: https://www.gameskinny.com/9c6x1/vrchat-guide-how-to-create-custom-avatars
0 Response to "Vrchat How to Upload a Custom Image Background"
Yorum Gönder